Monday, February 15, 2016

Techforce Pro Huge Update! Big Changes to Floor Plans


Over the past month, we have seen Techforce Pro being used in ways we didn't think of.  This led us to realize that there is a problem with having the large icons of the real products and diagrams directly on the floor plan, especially when there are many of them close together.

I personally sat with many of you watching how you used Techforce Pro, and based on my observation, your feedback, we have made great improvements that we think you'll like!

First, we added an easy way to copy parts and diagrams without having to add the same part/diagram over and over again.  When you hover one of the icons, not only will the arrows to add wires appear,but also a "Copy" icon that makes an exact duplicate of that item.  This will greatly improve productivity for items like smoke detectors, and camera's.  This feature is available for parts and diagrams.


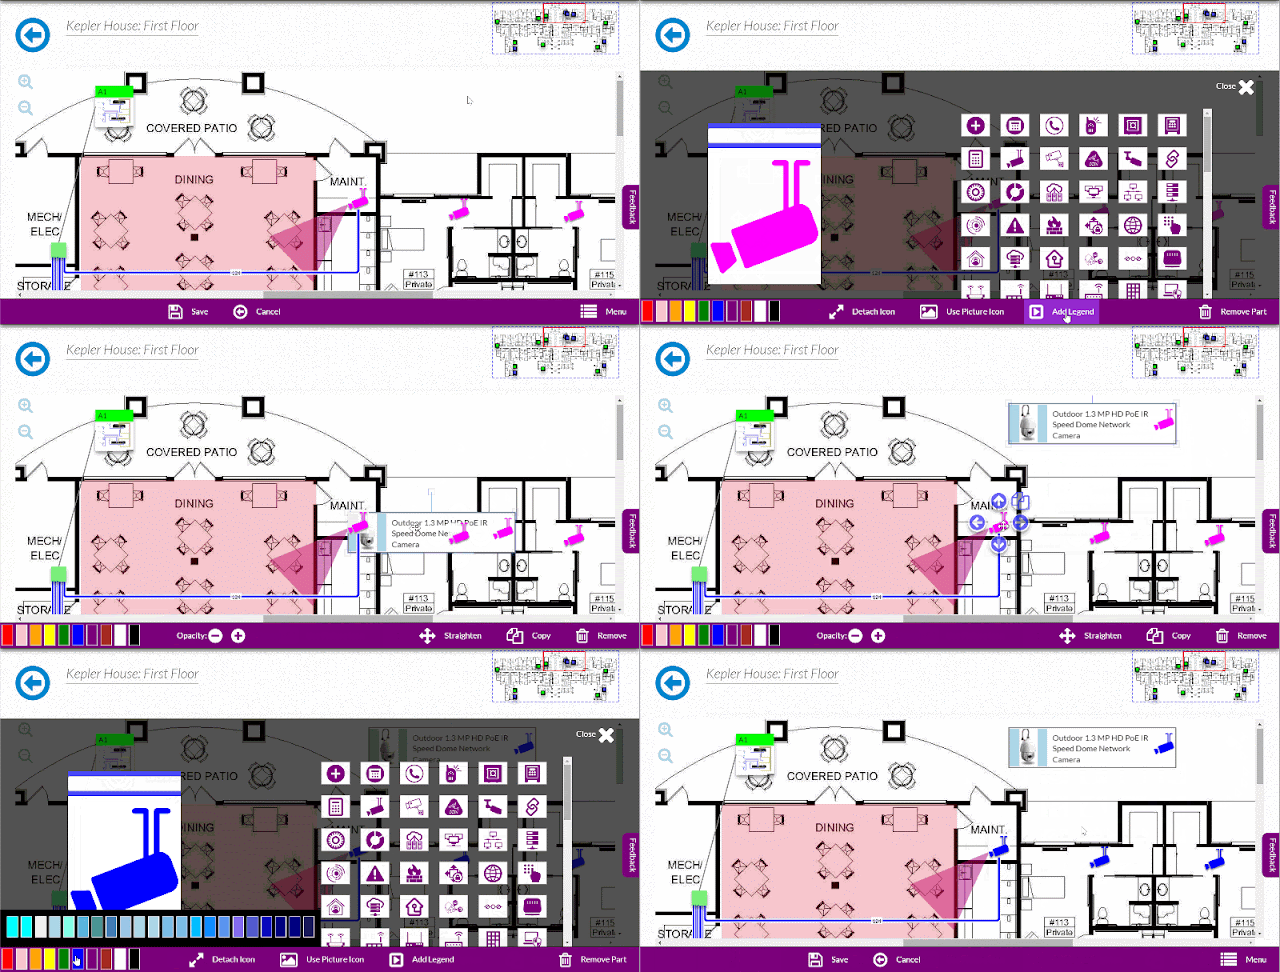
The next part of this update is the ability to separate the icon from the wire's drop point.  That icon takes up a lot of space, so get it out of the way while keeping the wire drop point where it should be on the floor plan.  This is available for parts and diagrams.


The next two updates are for Parts only.  Sometimes, you add many parts to a floor plan that are very close together.  You now have the option to switch out the icon for a different icon.  When you make a copy of the part, the icon settings and label copy too.


Now the problem with changing out a part for an icon is that you no longer have the image of the original part.  So you need to add a reference somewhere to indicate what part that icon represents.  This is done by adding a legend for the item.


Notice at the end of this short video how changing the color of one of the icons to blue, also changes the color of all other icons for that specific part, as well as the legend.  Any changes you make to the icon get applied to all icons of that part.  Separating the part from the wire drop point, and editing the part label only apply to the part you are editing.  These icons all change size with the global settings icon size setting.


So this update will really clean up your floor plans by allowing you to move items off the actual floor plan that don't need to be there.  And by using the quick buttons for duplicating parts and diagrams, your productivity will skyrocket!

Tuesday, February 9, 2016

Your Company Logo and Label on your Floor Plans

When you leave behind your documentation for your customer, you want them to know and remember your brand.  Techforce Pro now enables you to upload your own company logo, and add that logo with a label to your customer floor plans.

First, go to your "Manage Account" page.  You will see the default logo in the upper right, and a "Change Logo" button to the left.


Click the "Change Logo" button and upload your logo.

When you go to edit one of your customers floor plans, the "Show Floorplan Label" option is found under Menu=> Settings.


Checking this box will add the label to the upper left corner of the floor plan.


As you can see, this label includes:
  • Your branding
  • The last modified date
  • The floor plan title, and description
  • The customers name


Thursday, February 4, 2016

Feature Update: Wiring Diagrams just got Easier!

At the core of Techforce Pro is creating wiring diagrams.  You drag one terminal to another, change it's color, and you're done.  You can also manipulate it a little but there isn't much more you can do...Until now.


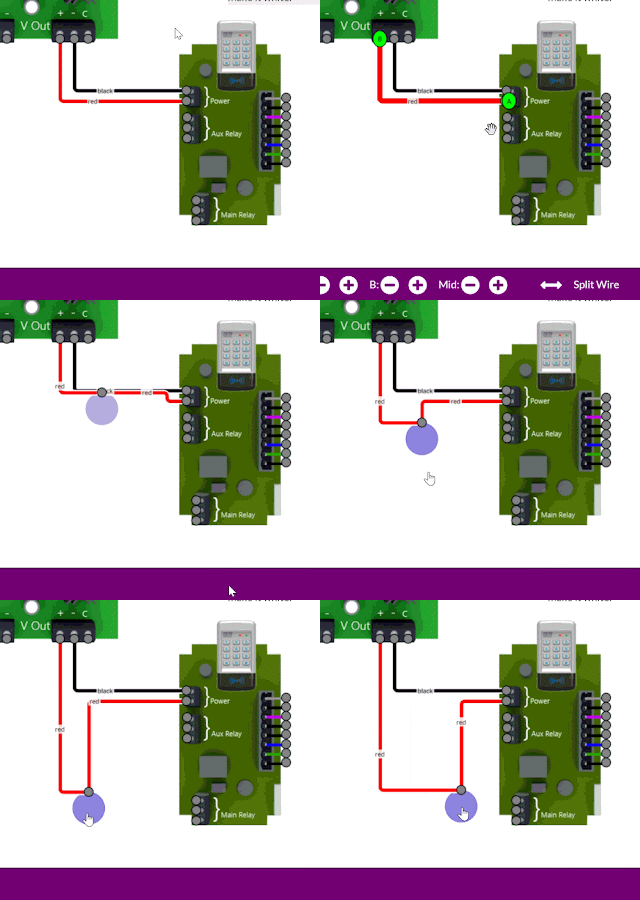
You had the ability to split wires on your customers floor plans already.  This feature was introduced there because the positioning of the wire is very important when viewing the wire's length.  However we found that you needed the ability to move wires around like that in the diagrams as well.


Splitting a wire adds the handle as you see in the above short animation.  Sometimes, the wire doesn't do exactly what you want when dragging the handle around, so we added the ability to rotate the handle changing how the wire and handle interact.  Rule of thumb: rotate the handle away from the direction that both parts are located, so in the animation below, the best rotation is down.


What makes splitting a wire in the diagram creator even sweeter?  Being able to drag a wire to the handle to create a splice point:


Monday, February 1, 2016

Techforce Pro Update: Changes to How You Wire Floor Plans


We have updated the way you create wires on your customer floor plans.  From your feedback, this update will make the task of creating your wire runs faster and easier.  The process is more intuitive as you never leave the view of the floor plan.


Simply hovering over the part or diagram will make the 4 arrows appear.  When you select a direction, all other part and diagram arrows will become visible for you to complete the wire run.  You will also have the option at the bottom to cancel the wire run if you change your mid or accidentally press an arrow.


With the arrows moved, clicking on a system or part will allow you to change the label.  Previously the items label was at the bottom of the page.  We moved it to the same location that the label is on the floor plan so it makes more sense.